WSL Setup in Windows 10 Pro
Why Should You Care?
For developers who need a Linux environment but prefer or are required to work within Windows, WSL offers a powerful solution. By using WSL 2 with Hyper-V and, if necessary, nested virtualization, you can enjoy the benefits of a full Linux experience directly on your Windows machine, with minimal overhead and without needing to reboot or manage a dual-boot setup.
What is WSL?
Windows Subsystem for Linux (WSL) is a compatibility layer for running Linux binary executables natively on Windows. WSL enables developers to use a Linux environment directly within Windows without the need for a dual-boot setup or using a full virtual machine. With WSL, you can run Linux command-line tools, utilities, and applications alongside your Windows applications, providing a seamless development experience.
There are two versions of WSL:
- WSL 1: Uses a translation layer to map Linux system calls to Windows system calls.
- WSL 2: Introduces a full Linux kernel running in a lightweight virtual machine (VM), offering increased compatibility and performance, especially for file system operations.
Why Hyper-V is Needed
Hyper-V is a crucial component for running WSL 2. Unlike WSL 1, which does not require Hyper-V, WSL 2 operates within a virtualized environment powered by Hyper-V. This allows WSL 2 to leverage a real Linux kernel, leading to improved system call compatibility and faster file I/O performance. Hyper-V ensures that the Linux kernel runs in an isolated, secure, and efficient environment on top of Windows.
- Virtualization: Hyper-V is a Type 1 hypervisor that enables hardware virtualization, allowing the Linux kernel to run directly on the machine’s hardware through a lightweight VM. This setup is essential for the full functionality of WSL 2.
Introduction to Hyper-V on Windows
The Role of Nested Virtualization
If you’re running WSL inside a virtual machine, you may need nested virtualization. Nested virtualization allows you to enable Hyper-V within a virtual machine, effectively letting you run virtualized environments (like WSL 2) inside another virtualized environment.
- Nested Virtualization: This is required if you’re working within a virtualized development environment, such as a Windows 10 VM running on a hypervisor like VMware or Azure. With nested virtualization, you can enable Hyper-V inside the VM, allowing you to install and run WSL 2.
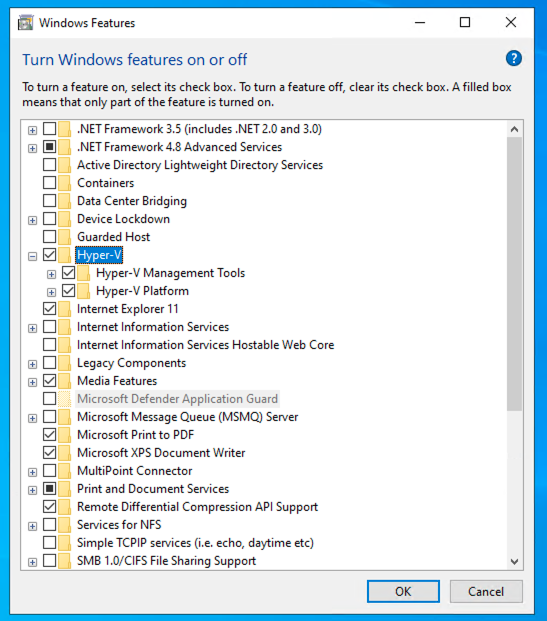
Enable Hyper-V
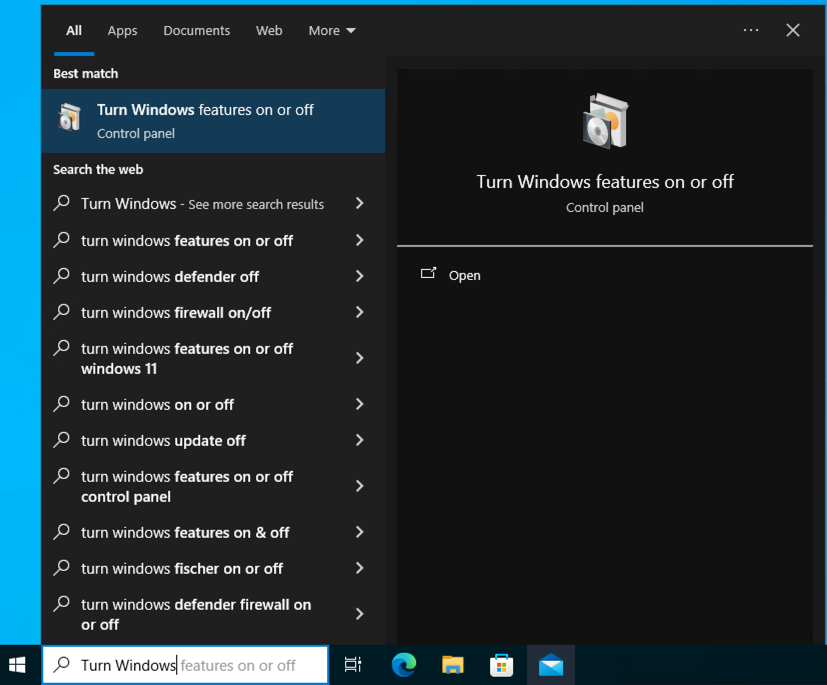
In the start search, search for “Turn Windows features on or off”.
Restart the PC.
Enable WSL
Search for the “Turn Windows features on or off”, and this time enable “Virtual Machine Platform” and “Windows Subsystem for Linux”

Restart the PC.
Configure WSL
Once WSl has been enabled in Windows it is good to check the status of it.
Check WSL status:
wsl --status
Depending on you Windows setting you might have to run WSL update.
Let’s update it:
wsl --update
There are several Linux distribution available. To list available Linux distributions:
wsl --list --online
Here is an example of the available distributions.
NAME                            FRIENDLY NAME
Ubuntu                          Ubuntu
Debian                          Debian GNU/Linux
kali-linux                      Kali Linux Rolling
Ubuntu-18.04                    Ubuntu 18.04 LTS
Ubuntu-20.04                    Ubuntu 20.04 LTS
Ubuntu-22.04                    Ubuntu 22.04 LTS
Ubuntu-24.04                    Ubuntu 24.04 LTS
OracleLinux_7_9                 Oracle Linux 7.9
OracleLinux_8_7                 Oracle Linux 8.7
OracleLinux_9_1                 Oracle Linux 9.1
openSUSE-Leap-15.6              openSUSE Leap 15.6
SUSE-Linux-Enterprise-15-SP5    SUSE Linux Enterprise 15 SP5
SUSE-Linux-Enterprise-15-SP6    SUSE Linux Enterprise 15 SP6
openSUSE-Tumbleweed             openSUSE Tumbleweed
For our dev deployments we install Ubuntu distribution:
wsl --install -d Ubuntu
For SecOps work we use kali-linux.
Configure Linux
Here is the minimal Linux package install that is required by Kubert.
sudo apt install net-tools jq make
Let’s break it down:
- sudo: This command runs the following commands with superuser (root) privileges. It’s required for installing software packages on the system since these actions require administrative rights.
- apt: This is the package management command-line tool in Ubuntu. It stands for “Advanced Package Tool” and is used to handle the installation, updating, and removal of software packages.
- install: This is a subcommand of apt that tells the package manager to install the specified packages.
- net-tools: This package provides various networking tools like ifconfig, netstat, route, arp, etc. These tools are often used to configure network interfaces, check network connections, and manage the routing table.
- jq: This is a lightweight and flexible command-line JSON processor. It allows you to parse, filter, and manipulate JSON data in a powerful and easy-to-use way.
- make: This is a build automation tool that automatically builds executable programs and libraries from source code by reading files called Makefiles. It’s commonly used in software development for compiling and linking programs.
Docker WSL
Docker WSL refers to the integration of Docker with the WSL. This setup allows you to run Docker containers directly within a WSL environment, which can be particularly beneficial for developers working on a Windows machine but needing a Linux-based environment for their Docker workloads.
The Docker WSL installation instruction can be found at Docker Desktop.
kind
kind (short for Kubernetes IN Docker) is a tool that allows you to run local Kubernetes clusters using Docker container “nodes.” It’s particularly useful for development, testing, and CI/CD workflows.
To install kind in a WSL environment, follow these commands:
# Check for system architecture and download the kind Binary
[ $(uname -m) = x86_64 ] && curl -Lo ./kind https://kind.sigs.k8s.io/dl/v0.24.0/kind-linux-amd64
# Make the kind Binary Executable
chmod +x ./kind
# Move kind to /usr/local/bin, a directory that's included in your system's PATH. This allows you to run kind from anywhere in your terminal without specifying its full path.
sudo mv ./kind /usr/local/bin/kind
Helm
Helm is a package manager for Kubernetes, similar to how apt or yum works for Linux. It helps you define, install, and manage Kubernetes applications. Helm uses a packaging format called “charts,” which are collections of files that describe a related set of Kubernetes resources. Helm simplifies the deployment process, making it easier to manage complex Kubernetes applications with many resources.
To install Helm in a WSL environment, follow these commands:
# Download the install shell script
curl -fsSL -o get_helm.sh https://raw.githubusercontent.com/helm/helm/master/scripts/get-helm-3
# Allow the shell script to Run
chmod 700 get_helm.sh
# Install Helm
./get_helm.sh
# Remove the script after install
rm get_helm.sh
Visual Studio Code
Visual Studio Code (VS Code) is a powerful and lightweight code editor developed by Microsoft. It’s highly popular among developers for its rich set of features, extensive extensions marketplace, and support for multiple programming languages. To enhance development in a WSL environment, you can install the WSL extension, allowing you to seamlessly work on projects within your WSL distributions directly from VS Code.
The VS Code WSL installation instruction can be found at VS Code